____________________________________________________________________________________________________
ECHOLINKPROXY CONFIG
&
NO-IP config pour linux sous Debian
Voici ce petit tutoriel pour configurer un proxy echolink
rendez-vous sur la page dédiée aux téléchargements :
http://www.echolink.org/register_data.jsp
| Callsign: | |
| E-Mail Address: |
La photo ci dessus vous invite à entrez vos données, afin d'avoir accès
aux fichiers à télécharger.
télécharger le fichier 1.2.3 que se trouve en bas de page
Other Downloads
EchoLink Proxy Software v 1.2.3 download
Works together with EchoLink (version 1.9 or above) to allow access to the EchoLink network via restricted Internet services in hotels, airports, offices, and other areas. Please see EchoLink Proxy for more info and installation instructions.
maintenant que vous avez le fichier, et JAVA runtime, décompressez le fichier
télécharger dans C: et ensuite modifiez le nom du fichier pour obtenir ceci
EchoLinkProxy.
Dans ce repertoire vous trouverez deux fichiers,ELProxy et l'EXE java file EchoLinkProxy
Ouvrez ensuite ELProxy vous trouverez ceci
-----------------------------------------------------------
# Sample EchoLink Proxy Configuration File
# REQUIRED ITEMS
# You must change the password to something besides "notset".
Password XXXXXXX
# OPTIONAL ITEMS
# Change Port to something else if you don't want to use the default.
# (If you use 1023 or below on Unix/Linux systems, you will need to run
# EchoLink Proxy as root.)
Port=8100
# ADVANCED ITEMS
# Set the ConnectionTimeout to something besides 0 if you want the proxy
# to "pull the plug" on a client that has been using the proxy for more
# than n minutes, regardless of whether an EchoLink connection is active.
ConnectionTimeout=0
# Set the BindAddress to something besides 0.0.0.0 if this is a computer
# with multiple IP addresses and you want to associate this instance of
# EchoLink Proxy with a single address only.
BindAddress= Entrez l'adresse ip du PC sur lequel est installé l'application proxy
sans oublier de lui attribuer les ports. 5200 TCP 5199 et 5198 en UDP
sans oublier de lui attribuer les ports. 5200 TCP 5199 et 5198 en UDP
# Set the ExternalBindAddress to something besides 0.0.0.0 if this is a
# multi-homed computer and you want to associate this instance of EchoLink
# Proxy with a specific interface for its Internet communication. In this
# situation, BindAddress will be used for the communication with the client,
# and ExternalBindAddress will be used for the communication with the Internet.
ExternalBindAddress=0.0.0.0
# Set the PublicAddress if this is a multi-homed computer and the address
# that appears on the Proxy Status Page is incorrect. In this situation,
# the address you specify here will be the address that appears on the
# Proxy Status page. This setting does not affect the behavior of the
# Proxy itself, only the way it is listed.
PublicAddress=
# Set RegistrationName to something unique (such as your callsign) if you
# want EchoLink Proxy to register itself with the EchoLink Web site.
# Enable this option only if you want the IP address of this server to
# be listed on the Web page. You might want to do this if the IP address
# of your server changes from time to time and you need to find out what
# it is. The Comment is optional.
# Note: If you want to "advertise" this Proxy as a Public proxy, and make
# it available to any EchoLink user, set the Password above to PUBLIC
# and set RegistrationName below to something unique, such as your call.
# This will cause the proxy to be also be listed on the Proxy List page
# on the EchoLink Web site. Note that each RegistrationName must be
# different for each instance.
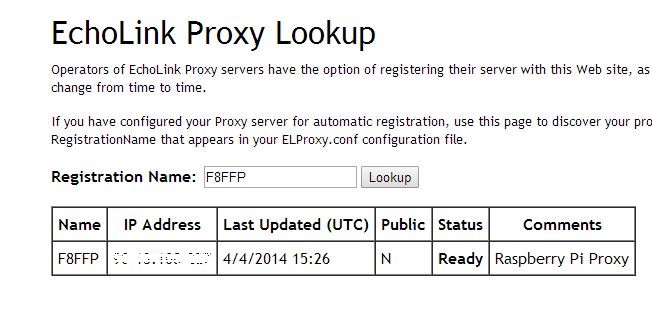
RegistrationName=F8FFP
RegistrationComment=Raspberry Pi
# If you want to restrict access to the proxy only to certain callsigns,
# create regular expressions for either or both of the following. A
# connection will be denied if it matches the CallsignsDenied pattern, or
# if it does NOT match the CallsignsAllowed pattern (and CallsignsAllowed
# is not empty). These patterns apply only to EchoLink clients that use
# this proxy, not the nodes to which they connect while using it.
# Examples: CallsignsAllowed=K1RFD|AK8V will allow K1RFD and AK8V to use this proxy.
# CallsignsDenied=.*-L$|.*-R$ will deny any Sysop nodes from using it.
CallsignsDenied=
CallsignsAllowed=
-----------------------------------------------------------
1Il suffit de rentrer votre mot de passe
2 PublicAdress sert uniquement si vous désirez mettre à disposition votre Proxy
DANS CE CAS METTRE "PUBLIC" EN MAJUSCULE COMME MOT DE PASSE
3 RegistrationName= votre Call
4 RegistrationComment= ajout d'un commentaire
Ensuite il reste à enregistrer le fichier.
Maintenant à l'aide de l'invite de commande, entrez les caractères rouges
Ensuite il reste à enregistrer le fichier.
Maintenant à l'aide de l'invite de commande, entrez les caractères rouges
Microsoft Windows XP [version 5.1.2600]
(C) Copyright 1985-2001 Microsoft Corp.
C:Documents and SettingsUser>cd..
C:Documents and Settings>cd..
C:>cd echolinkproxy
C:EchoLinkProxy>java -jar echolinkproxy.jar
EchoLink Proxy version 1.2.3
Listening for connections on port 8100
Ready for new client connection.
Maintenant pour le cas ou vous souhaitez mettre en ligne votre proxy, avec les informations suivantes, n'oubliez pas mettre PUBLIC comme mot de passe.
EX:
RegistrationName=F5XXX
RegistrationComment= proxy test
PublicAddress=f5xxx.no-ip.org
PublicAddress=f5xxx.no-ip.org
Vous avez la solution NO-IP que j'utilise avec l'adresse f8ffp.no-ip.org, ce qui permet de cacher votre adresse Ip mais là, je ne vous apprends rien !
Pour cela il faut aller ici
http://www.no-ip.com/services/managed_dns/enhanced_dynamic_dns.html
Depuis le téléphone
- ajouter l'adresse ip du votre routeur (free, orange, sfr etc).
- selectionnez le port 8100
- entrez le même mot de pass que celui du fichier Elproxy.cfg
lien
Je travaille sur un tutoriel pour linux et debian wheeze sur l'un de mes
Raspberry Pi, ainsi que sur mon alix3D3 et Voyage Linux
73'Z
NO-IP config pour linux sous Debian
tutoriel par F8FFP pour utilisation sur Raspberry Pi et la version wheeze debian
Contact: f0ffp@free.fr
73'z by F8FFP
Configurer no-ip sous linux sur mon raspberry Pi, suivre le tutoriel ci dessous
Connecter sous root bien sûre avant de commencer.
========================================================================================================
login as: root
root@192.168.0.14's password:
Linux raspberrypi 3.2.27+ #250 PREEMPT Thu Oct 18 19:03:02 BST 2012 armv6l
The programs included with the Debian GNU/Linux system are free software;
the exact distribution terms for each program are described in the
individual files in /usr/share/doc/*/copyright.
Debian GNU/Linux comes with ABSOLUTELY NO WARRANTY, to the extent
permitted by applicable law.
Last login: Sat Dec 15 17:03:41 2012 from 192.168.0.10
root@raspberrypi:~# cd /usr/local/src
root@raspberrypi:/usr/local/src# wget http://www.no-ip.com/client/linux/noip-duc-linux.tar.gz
--2012-12-15 17:06:51-- http://www.no-ip.com/client/linux/noip-duc-linux.tar.gz
Resolving www.no-ip.com (www.no-ip.com)... 8.23.224.110
Connecting to www.no-ip.com (www.no-ip.com)|8.23.224.110|:80... connected.
HTTP request sent, awaiting response... 200 OK
Length: 134188 (131K) [application/x-gzip]
Saving to: `noip-duc-linux.tar.gz.2'
100%[======================================>] 134,188 151K/s in 0.9s
2012-12-15 17:06:52 (151 KB/s) - `noip-duc-linux.tar.gz.2' saved [134188/134188]
root@raspberrypi:/usr/local/src# tar xzf noip-duc-linux.tar.gz
root@raspberrypi:/usr/local/src# cd noip-2.1.9-1
root@raspberrypi:/usr/local/src/noip-2.1.9-1# make
make: `noip2' is up to date.
root@raspberrypi:/usr/local/src/noip-2.1.9-1# make install
if [ ! -d /usr/local/bin ]; then mkdir -p /usr/local/bin;fi
if [ ! -d /usr/local/etc ]; then mkdir -p /usr/local/etc;fi
cp noip2 /usr/local/bin/noip2
/usr/local/bin/noip2 -C -c /tmp/no-ip2.conf
Auto configuration for Linux client of no-ip.com.
Please enter the login/email string for no-ip.com fxxxx@xxxx.fr
Please enter the password for user 'fxxxx@xxxx.fr' ********
Only one host [fxxxx.no-ip.org] is registered to this account.
It will be used.
Please enter an update interval:[30]
Do you wish to run something at successful update?[N] (y/N) N
New configuration file '/tmp/no-ip2.conf' created.
mv /tmp/no-ip2.conf /usr/local/etc/no-ip2.conf
root@raspberrypi:/usr/local/src/noip-2.1.9-1#/usr/local/bin# noip2
root@raspberrypi:/usr/local/bin# One noip2 process is already active,
and the multiple instance flag (-M) is not set.
=====================================================================================
RETOUR AU LANCEMENT DE JAVA ECHOLINKPROXY
root@raspberrypi:/usr/local/bin# /usr/local/bin#
root@raspberrypi:/usr/local/bin# cd ..
root@raspberrypi:/usr/local# cd ..
root@raspberrypi:/usr# cd ..
root@raspberrypi:/# cd ..
root@raspberrypi:/# java -jar EchoLinkProxy.jar
EchoLink Proxy version 1.2.3
Listening for connections on port 8100
Posting registration info to EchoLink Web site
Ready for new client connection.
Client connected: 192.168.0.13
Client authenticated (call=HB9EWF).